[How to Use VIA (Beginner's Guide)] -- by Phoebe Wang on Jan 11, 2024
Today, we will dive deeper into how to utilize VIA to manage layers and assign any key on your keyboard. We will walk you through the detailed steps and highlight the benefits of these features.
PART 1. Layers
Layers in VIA allow you to create multiple key layouts that can be switched on-the-fly, enabling you to have different functions for the same keys depending on the layer you are using, which means the lower-keycount keyboards could achieve the functionality of higher-keycount or even full-size keyboards. By assigning different functions to multiple layers, users can access a wide range of commands and features without needing additional physical keys, maximizing efficiency and versatility. This is particularly useful for customizing your keyboard for various tasks such as gaming, coding, or general use.
1. The MO(n) key is an essential feature for layer switching on a programmable keyboard. When the MO key is held down, it temporarily activates the designated layer specified by the number n in parentheses.

For example, if I set the Fn key on Layer 0 to MO(1) and assign the Z key on Layer 1 to the number 1, pressing and holding the Fn (MO1) key while pressing the Z (1) key will result in the input of the number 1, reverting to the base layer once the key is released.


Layer switching isn't limited to basic keys; you can also assign special keys, multimedia controls, lighting keys, and macros to different layers. This allows for extensive customization, enabling you to access various functions and commands on different layers, enhancing the overall versatility and functionality of your keyboard.
2. The OSL(n) function, which stands for One Shot Layer, provides a temporary switch to a specified layer (Layer n). When OSL(n) is activated, the keyboard momentarily transitions to the indicated layer, allowing for a single key action. After pressing any key on this layer, the keyboard automatically reverts to the default layer (Layer 0). This feature is particularly useful for executing a single action on a different layer without permanently changing layers.
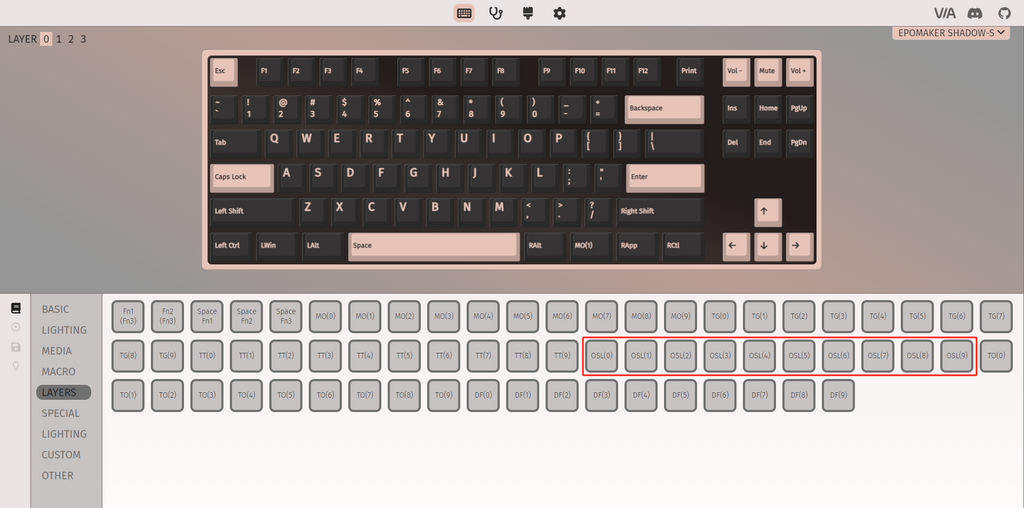
For instance, if you configure the Fn key on Layer 0 to OSL(2) and assign the Z key on Layer 2 to input the number 3, pressing the Fn (OSL(2)) key briefly, followed by the Z (3) key, will result in the input of the number 3. Thus, the OSL function enables a temporary switch to Layer n with a brief key press, and after a key on Layer n is triggered, it seamlessly returns to Layer 0.


3. The Fn1 (Fn3) key offers dual functionality, enhancing the versatility of your keyboard layer management. The first function operates similarly to MO(1): pressing and holding Fn1 temporarily switches the keyboard to Layer 1, reverting to Layer 0 upon release. The second function is activated by simultaneously pressing and holding both Fn1 and Fn2, which switches the keyboard to Layer 3. This dual capability allows for flexible and efficient layer switching, providing a robust solution for advanced keyboard customization.

4. The Space Fn(n) function enables dual functionality for enhanced keyboard efficiency. A short press of the key outputs a single space, while a long press temporarily switches the keyboard to Layer n. Upon release, the keyboard automatically reverts to Layer 0. This behavior mirrors the functionality of MO(n), offering a convenient method for temporary layer switching while maintaining the primary function of the space key.

The above 4 methods are for temporary layer switching. Now, let's explore how to achieve permanent layer switching.
5. The TG(n) function stands for "toggle," which facilitates a permanent switch to Layer n without reverting automatically to Layer 0. This function allows toggling between two layers, but it does not support switching among multiple layers. For instance, if you configure the Fn key on Layer 0 to TG(3) and assign the Z key on Layer 3 to input the number 9, pressing the Fn key once will permanently switch the keyboard to Layer 3. Consequently, subsequent presses of the Z (9) key will consistently result in the input of the number 9, regardless of how many times it is pressed and released. This toggle functionality provides a reliable means of maintaining a persistent layer switch for specialized tasks.


Once the keyboard is permanently switched to Layer 3 using TG(3), it remains on this layer until manually switched back. To return to Layer 0, you can employ one of the following methods:
-
KC_TRNS: Place KC_TRNS (transparent key) in the same key position as TG(3). This key is represented by an inverted triangle on the basic layer. Pressing this key will revert the keyboard to the base layer, Layer 0.
-
TO(0): Configure any key position to TO(0), which explicitly transfers the keyboard back to Layer 0 when pressed.
Both methods provide a straightforward way to revert to the default layer after toggling to a different layer with TG(n), ensuring flexible and efficient layer management.

6.The TO(n) function is designed to switch to Layer n with a short press, maintaining that layer until another layer switch is manually initiated. This function supports permanent toggling between multiple layers, enhancing the flexibility of your keyboard layout.
For example, if you configure TO(3) on Layer 0 and TO(5) on Layer 3, you can seamlessly transition from Layer 0 to Layer 5 with just two short presses. First, pressing TO(3) switches from Layer 0 to Layer 3. Then, pressing TO(5) switches from Layer 3 to Layer 5.

PART 2. The Any key
The "Any" key in VIA provides multifunctionality through both simple presses and long holds. A short press outputs a designated keycode, while a long press triggers a layer change, allowing access to alternative key functions. Additionally, short presses can activate keycodes, and long presses can transform the key into a modifier such as Ctrl, Alt, or Shift, enhancing its utility. Unlike macros, which are typically limited to 16 combinations, the configurations of the "Any" key are virtually limitless. It's important to note that certain keyboards, such as those with small screens or multi-mode capabilities, may not support the "Any" key.
1. Using LT for Layer Switching: The LT function, which stands for "Layer Tap," is a common method for layer switching. The syntax is LT(layer, kc), where holding the key switches to the specified layer, and tapping the key triggers a keycode. For example, LT(3, KC_D) means it temporarily switches to Layer 3 when held down and outputs the key value D when tapped.Let's illustrate with a practical example:
- Assume we are on Layer 0, and we configure the D key as an "Any" key. During setup, a window appears where we input keycodes, such as LT(3, KC_D), and confirm to complete the setup.
- Next, we switch to Layer 3 and set the Z key to output the number 3.
- By holding down the D key (configured as LT(3, KC_D)) and pressing the Z key, the keyboard outputs the number 3, indicating a successful switch to Layer 3.
- Releasing the D key returns the Z key to its normal function, demonstrating an automatic return to Layer 0.


This setup showcases the efficiency and flexibility of the LT function in managing layer switches and enhancing the overall functionality of the keyboard. It's important to note that LT suppresses continuous key outputs, so tapping twice before holding down the key is necessary. Also, it's recommended not to set LT on Modifier keys to avoid potentially overriding their functions.
2. The term MT(mod, kc) stands for "Modifier Tap." This functionality allows a key to serve dual purposes, acting as a modifier when held down and registering a different keypress when tapped quickly. The setting method is the same as LT.
- Long Press: When you hold down the key, it functions as the specified modifier.
- Short Press: When you tap the key quickly, it triggers the specified keycode.
The code MT(MOD_LCTL, KC_CAPS). In this instance:
- Long Press: When you press and hold the key, it functions as the Control (Ctrl) key.
-
Short Press: When you tap the key quickly, it toggles the Caps Lock on and off.

This dual functionality is particularly useful in keyboard configurations where you want to maximize the efficiency and functionality of your key layout by assigning multiple functions to a single key.
3. The modifier key combination is mod+kc. In VIA, modifier key combinations are used to trigger specific actions or functions. The syntax for these combinations follows a pattern:
- Shift + KC: Represented as S(KC)
- Ctrl + KC: Represented as C(KC)
- Alt + KC: Represented as A(KC)
- GUI + KC: Represented as G(KC)
Unlike the MT (Modifier Tap) function, which activates different actions based on whether the key is long-pressed or short-pressed, modifier key combinations involve simultaneously holding down the modifier key (mod) and the specified key (KC) to achieve the desired effect.
For example, let's see the 'Alt + A' shortcut for taking a screenshot (APP: iShot). This combination can be set using a macro as {KC_LALT, KC_A}, or using the Any key. First, we need to find the syntax for the alt key combination, which is A(KC) according to the QMK documentation. Therefore, the keycodes for "alt+a" would be represented as A(KC_A). Now, let's set this combination in VIA. We'll assign it to the "a" key on the second layer. Once configured, when we hold down the "d" key to switch to the second layer, pressing "a" while holding the "alt" key will trigger the screenshot function.


Similar syntax applies to the other three modifier keys (Shift, Ctrl, and GUI), and nested combinations can be achieved for multiple modifier keys. For example, macOS has a built-in screenshot shortcut "shift+command+4." The keycodes for this combination in VIA would be S(G(KC_4)), ensuring the parentheses match the nested structure. VIA will automatically adjust nested modifiers. When you confirm the combination and then click "any," you can see that VIA has automatically modified it.

VIA automatically adjusts nested combinations, simplifying the setup process. Once familiar with S, C, A, and G modifiers, users can achieve a wide range of functions using nested combinations.
4. Strategies: When it comes to optimizing key configurations in VIA, there are a few recommended strategies to consider, this setup allows you to do everything but type with your left hand on the keyboard and your right hand on the mouse, which is incredibly comfortable and increases productivity and comfort for a variety of tasks:
-
Layer switching on layer 0: Set up several layer-switching keys on Layer 0. This allows for quick access to different layers without interrupting your typing flow. Commonly used layers, such as function layers or gaming layers, can be easily toggled using these dedicated keys.
-
Placement of common shortcuts on other layers: On layers beyond Layer 0, especially on the left-hand side, allocate frequently used shortcuts, particularly those that require two-handed operation. Utilize macros or Any key combinations to assign these shortcuts, making them easily accessible with a single hand. By placing these shortcuts within reach of the left hand, users can perform common tasks efficiently without needing to interrupt their typing workflow.
VIA offers extensive customization capabilities, these functions enable efficient and flexible keyboard layouts by facilitating temporary and permanent layer changes, single-action switching, toggling between layers, and sustained layer alterations. Discovering and experimenting with these features in VIA can lead to exciting possibilities for personalizing your keyboard experience. If you have any questions or want to share your experiences with VIA, feel free to leave them in the comments section below—let's explore together!


