


The following contents credit to: Sif Qiu
Download
- Software: https://epomaker.com/blogs/software/epomaker-th80-x-driver
- PDF Manual: https://cdn.shopifycdn.net/s/files/1/0280/3931/5529/files/TH80_X_manual.pdf?v=12606172893751139375
Q&A
(Click to skip to the question you’d like to view)
- How to connect TH80-X wirelessly (2.4ghz, Bluetooth)
- How to use the knob to set backlight, layers, and keyboard mode
- How to change Software display to English (Help guide when the Software is stuck in Chinese)
- How to Upload gif and photo
- How to Sync Time for your screen
FN+ Shortcuts for Backlight

- Turn the keyboard on. (Turn the mode switch to the right side, which is closer to the USB port)
-
Bluetooth:
-
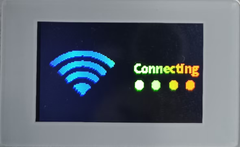
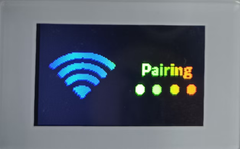
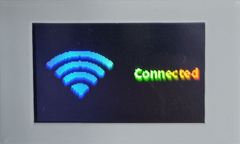
Pairing a new device: Press FN+1 (or 2 or 3) once, and then press FN+1 (or 2 or 3) a second time and holding until the screen displays pairing, then connect the device on your PC’s Bluetooth setting. [Connecting -> Pairing -> Connected]
-
 ->
->  ->
-> 

-
-
Connect to paired device: Press FN+1/2/3 once and connect the device on your PC’s Bluetooth setting. [Connecting -> Connected]
-
->
-
- Wireless 2.4ghz
-
Pairing a new device: Press FN+4 once, and then press a second time and holding until the screen displays pairing, then connect the device on your PC. [Connecting -> Pairing -> Connected]
-
 ->
->  ->
-> 
-
-
Connect to paired device: Press FN+4 [Connecting -> Connected]
-
->
-
-
Pairing a new device: Press FN+1 (or 2 or 3) once, and then press FN+1 (or 2 or 3) a second time and holding until the screen displays pairing, then connect the device on your PC’s Bluetooth setting. [Connecting -> Pairing -> Connected]

Screen UI and Interaction
Press FN+Knob once to go back and forth between Multimedia Mode or Screen Interaction Mode.
After 5 seconds of inactivity, the knob will automatically go back to Multimedia Mode.
- Multimedia Mode
Knob is set to Multimedia Mode by default. In Multimedia Mode, turning the knob left or right can increase or decrease volume, or does the thing you remapped it to do in the Epomaker Software.
- Screen Interaction Mode (Press Fn+Knob to enter to this mode, and press it again to exit it)
In this mode, screen will either displaying a media file of your chosen, or the System Information. (You can adjust which page to display in
When at System Information page, press the knob to go to Menu.
When the current displayed is what you preferred, leave the knob as it is and after 5 seconds, the setting is auto-saved. Press Fn+Knob to go back to Multimedia Mode.
-
System Information:
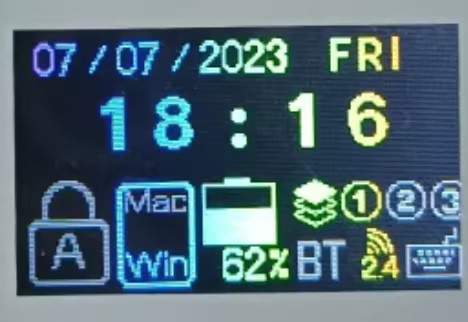
- The above example is showing: Keyboard is in Win mode and layer 1, with a 62% battery and connected to your computer in 2.4ghz.
-
In Screen Interaction Mode -> Menu: Turning Knob left or right to go browse the Menu and press the knob once to go to one of the 7 sub-menus:
- “Photo/gif”, “Lights”, “RGB Color”, “Brightness”, “Speed”, “OS Mode”, “Layer”
- For a demonstration video on how these 7 sub-menus works, click here.
-
In Screen Interaction Mode -> Menu -> Photo/gif
- Photo/gif: In this sub-menu, you can select one of multiple saved media files to be displayed in Multimedia Mode. Usually, the Gif is saved on the final layer, while the 5-layer static images are placed before it. (For tutorial on how to save/upload these media files, please refer to How to Upload gif and photo)
-
In Screen Interaction Mode -> Menu -> Lights
- Lights: In this sub-menu, you can rotate the knob to select one of the Backlight Effect. Press once to select an effect and then wait until the screen goes back to System Information Page. (You can also use FN+\| to toggle light effects)
-
In Screen Interaction Mode -> Menu -> RGB Color
- RGB Color: In this sub-menu, you can rotate the knob to select one of the Backlight colors. Press once to select and then wait until the screen goes back to System Information Page. (You can also use FN+P to toggle light color in any mode)
-
In Screen Interaction Mode -> Menu -> Brightness
- Brightness: In this sub-menu, you can rotate the knob to increase or decrease light effect’s speed. Simply toggle the knob until you are satisfied with the speed, and then wait until the screen goes back to System Information Page. (You can also use FN+↑/↓ to change brightness)
-
In Screen Interaction Mode -> Menu -> Speed
- Brightness: In this sub-menu, you can rotate the knob to select one of the Backlight colors. Press once to select and then wait until the screen goes back to System Information Page. (You can also use FN+←/→ to adjust speed)
-
In Screen Interaction Mode -> Menu -> OS Mode
- OS Mode: In this sub-menu, you can use the knob to change to WIN or macOS mode. Press the knob once to select.
-
In Screen Interaction Mode -> Menu -> Layer
- Layer: In this sub-menu, you can use the knob to change to one of the 3 layers you programmed in the Epomaker Software/Driver.
How to Upload gif and photo
-
Wired mode: Connect your TH80-X to your computer with a cable and toggle the mode switch to OFF, and then press FN+5
- Run the Epomaker Software/driver. (Click here to download)
- Upload Gif: EP Software -> Sketchpad -> Sketchpad

- Click select picture and browse the gifs you have on your PC.
- Adjust Gif’s Delay: the higher the number is, the slower the gif.
- Preview and check the Gif
- Click “Upload gif”, make sure you don’t use the keyboard or computer while gif is uploading. When uploading is finished, you should find the gif saved on keyboard’s Photo/gif on layer
-
Upload Doodle/Create Sketch and animation: EP Software > Sketchpad > Sketchpad
- Tools:
- RGB or Black white

- Paint or erase

- Colors

- The buttons framed in yellow can be used to add more frames for animation.

- Once you have finished painting, you can preview the doodle, select which layer you want to upload it to, and click on upload current frame or upload gif. (To know more about the 5 layers on screen, click here)

If the Software is stuck in Chinese / How to change software display to English:

How to Sync Time for your screen

Credit to: Sif Qiu


How cen I get swiched layers on keyboard?
How cen I get swiched layers on keyboard?
How cen I get swiched layers on keyboard?
How cen I get swiched layers on keyboard?
my lcd screen stopped working after attempting to update the drivers